Requirements Gathering: Complete Guide & Template


Requirements gathering is a process that allows you to set and manage expectations with stakeholders, prevent scope creep, and reduce ambiguity about what your project is actually delivering.
The more requirements documentation you have, the less room for error and assumption there is. The checks and balances will benefit your team’s mutual understanding of the project and your client’s expectations of the final product.
What Is Requirements Gathering in Project Management?
Requirements gathering is the process of determining what the project sponsors and key stakeholders need from the project. Project managers work to identify what is being asked for and the details around the ask.
These asks become the list of requirements for the project. Delivery against the requirements will determine if the endeavor is considered a successful project or not.
Project managers use requirements documents and requirements management tools to keep track of these types of requirements throughout the project:
- Functional requirements
- Technical requirements
- Non-functional requirements
- System requirements

Why Is Requirement Gathering Important?
Requirements gathering is important for the following reasons (as is documenting those requirements):
- It serves as a point of reference to document the evolution of a project, its moving parts, and its implementation
- It serves as a blueprint for the project stakeholders to better understand what to expect out of the project (the what, where, when, and why of the project).
- It reduces room for errors and ambiguity, because requirements are clearly documented and agreed upon before work starts.
- It provides checks and balances throughout project production and QA, allowing the project managers and team members to refer back to it when ever there is doubt about how to proceed.
In addition to outlining what they can expect, effective requirements management planning should outline what not to expect. Including an “Assumptions” and/or “Exclusions” section is a wise approach to eliminate the risk of the dreaded client imagination.
A Software Requirement Specification Example
Here is an example requirement specification for an ecommerce project:
- What: PayPal integration
- Where: Checkout
- When: Within step 3 of 4 in the checkout experience (after the shipping address webform, before confirmation)
- Why: An established integration (e.g. PayPal) is a better solution than a robust custom build integration for a payment service in this case because it easily meets business requirements.
- Assumptions
- Flat fee for all shipping & handling
- All shipping is within the U.S. (not including Alaska or Hawaii)
- Taxes do not apply
- Exclusions
- Custom shipping & handling fee calculations
- Shipping internationally, to Alaska, or to Hawaii
- Tax rules
Remember: the smaller the delta between client expectation and reality with their digital product, the happier your client is going to be with the end result. The quality of your requirements management directly correlates with your ability as a project manager to reduce any gray area when it comes to client expectations.
A vast majority of the time, a client will be receptive to you limiting scope creep if it means you're preserving their budget; if you educate the client sufficiently on why a feature will be addressed (or not addressed) and then document the logic behind that approach within the requirements, your client is far more likely to be collaborative.
They’re more likely to provide their approval, and further down the road when they're doing User Acceptance Testing (UAT), they will have a head start on understanding the "why" behind your team's solution.
6 Step Requirements Gathering Process
While requirements gathering should start as soon as an engagement starts and throughout your entire project life cycle, it’s never too early to start gathering and documenting requirements. In fact, start yesterday.
Here are the steps on how to gather requirements.
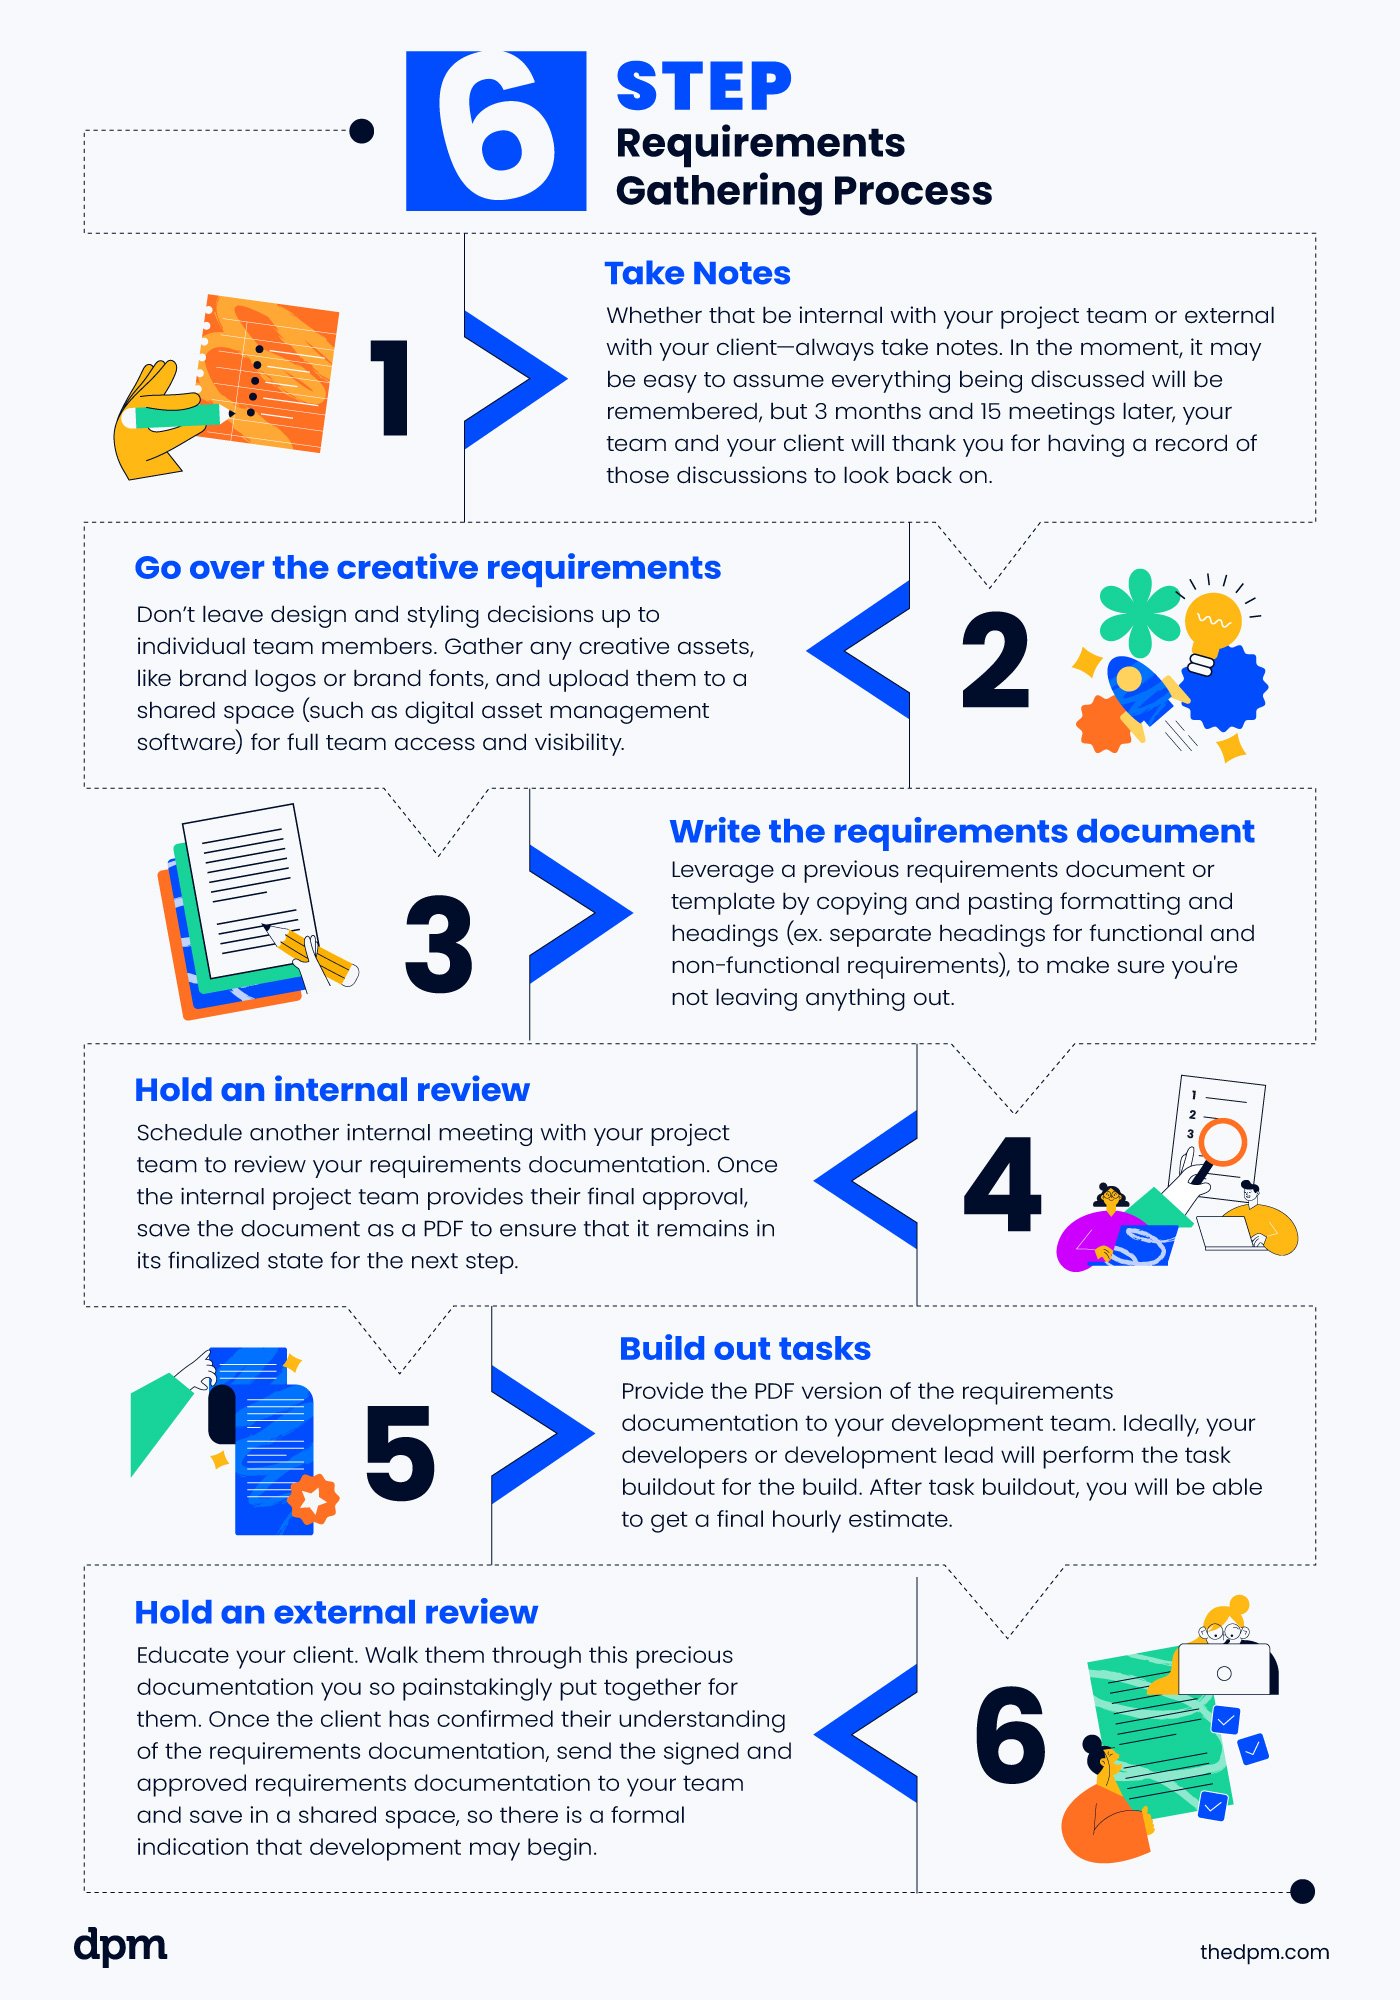
1. Take Notes
In every meeting you’re in—whether that be internal with your project team or external with your client—always take notes. Never assume someone else is taking them.
In the moment, it may be easy to assume everything being discussed will be remembered, but 3 months and 15 meetings later, your team and your client will thank you for having a record of those discussions to look back on.
Check out some of my recommended procedure for taking requirements notes here:
- Before going into your meeting, prepare your notes document to reflect your agenda so organizing the action items and points will be easier. This way, you’ll remember what’s needed while capturing related information in an organized manner.
- After any meeting, schedule 15-30 minutes for yourself to review your notes, digest what was discussed, complete a prioritization of action items, and identify challenges/red flags or needs for clarification or additional meetings.
- Send your notes to your internal project team. Have them review and verify what you’ve identified as action items, red flags, etc.
- Once the team has given you their blessing, send your notes to your client.
- Finally, leverage your notes as reference for creating tasks out of each action item. Add any new information into your requirements documentation, and schedule any needed meetings for additional discovery or discussion.
2. Go over the creative requirements
Don’t leave design and styling decisions up to individual team members: codify creative requirements whenever possible. Creative guidance is invaluable for developers. At the very least, make sure you have a style guide on hand—even if it's as bare bones as font and brand colors.
Gather any creative assets, like brand logos or brand fonts, and upload them to a shared space (such as digital asset management software) for full team access and visibility.
3. Write the requirements document
As you dive into documentation, remember: your first go at requirements documentation will be the most difficult. Why? Because you do not have a previous document to leverage (aka COPY-PASTE). Lucky for you, this article includes a requirements documentation template to serve as a foundation for you.
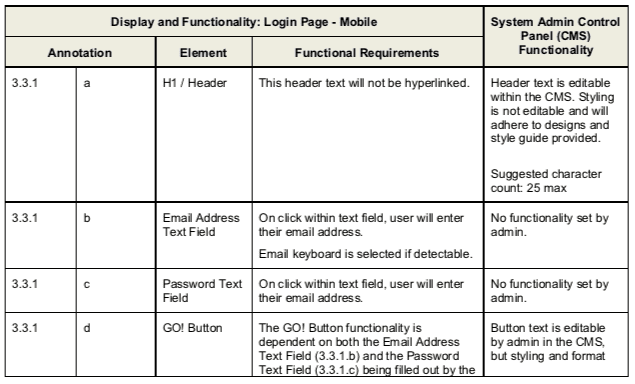
As displayed in this template, I organize my requirements documentation into four parts:
- Annotation: Includes the numbers from your annotated design. If your page design has 8 elements on it, you will have 8 annotations, and your annotation column will have 8 rows
- Element: Includes element titles, as they relate to each annotation
- Functional requirement: Includes a definition (the requirements, spelled out) for each element
- Admin/CMS functionality: Define any administrative and/or CMS functionality, as is related to the corresponding element
4. Hold an internal review
In this part of the requirements gathering process, schedule another internal meeting with your project team to review your requirements documentation. This is a final internal check and balance to ensure your understanding of the implementation.
If possible, have the team review your requirements documentation prior to the meeting so they’re able to come ready with their questions and/or feedback. Use the meeting to discuss any questions or feedback on the requirements.
Make any necessary revisions to the documentation, based on your internal discussion. Finally, re-send the revised requirements documentation to the team for one final blessing. Once the internal project team provides their final approval of the requirements documentation, save the document as a PDF to ensure that it remains in its finalized state for the next step: task buildout.
5. Build out tasks
Provide the PDF version of the requirements documentation to your development team. Ideally, your developers or development lead will perform the task buildout for the build.
While some organizations may operate under a process where project managers build out all tasks, I prefer to have developers build out their own tasks; the handful of hours it takes for them is worth it.
You can still provide useful guidelines for your team as they build out their development tasks and deliverables. After task buildout, you will be able to get a final hourly estimate.
Compare that projection to the project timeline that has been communicated to your client previously, and manage accordingly if/as needed. For more on estimating projects, see this complete project estimation guide.
6. Hold an external review
It’s time to present the requirements documentation to your client. Provide this as a PDF to ensure no edits are made. This (1) exemplifies investment on your part to ensure client understanding of the digital solution and (2) will be insurance for you to be able to say “I told you so” (but far more eloquently) when project scope creep inevitably rears its head.
Educate your client. Walk them through this precious documentation you so painstakingly put together for them. Remember: they are the experts of their business. You are the expert of the digital solution you’re offering them. They are paying you for this solution. Educate and empower your client.
Once the client has confirmed their understanding of the requirements documentation, it’s time to receive formal approval. Send the signed and approved requirements documentation to your team and save in a shared space, so there is a formal indication that development may begin.
Requirements Gathering Techniques
Here are some techniques to help you ensure you’re doing the important requirements gathering work to the best of your abilities:
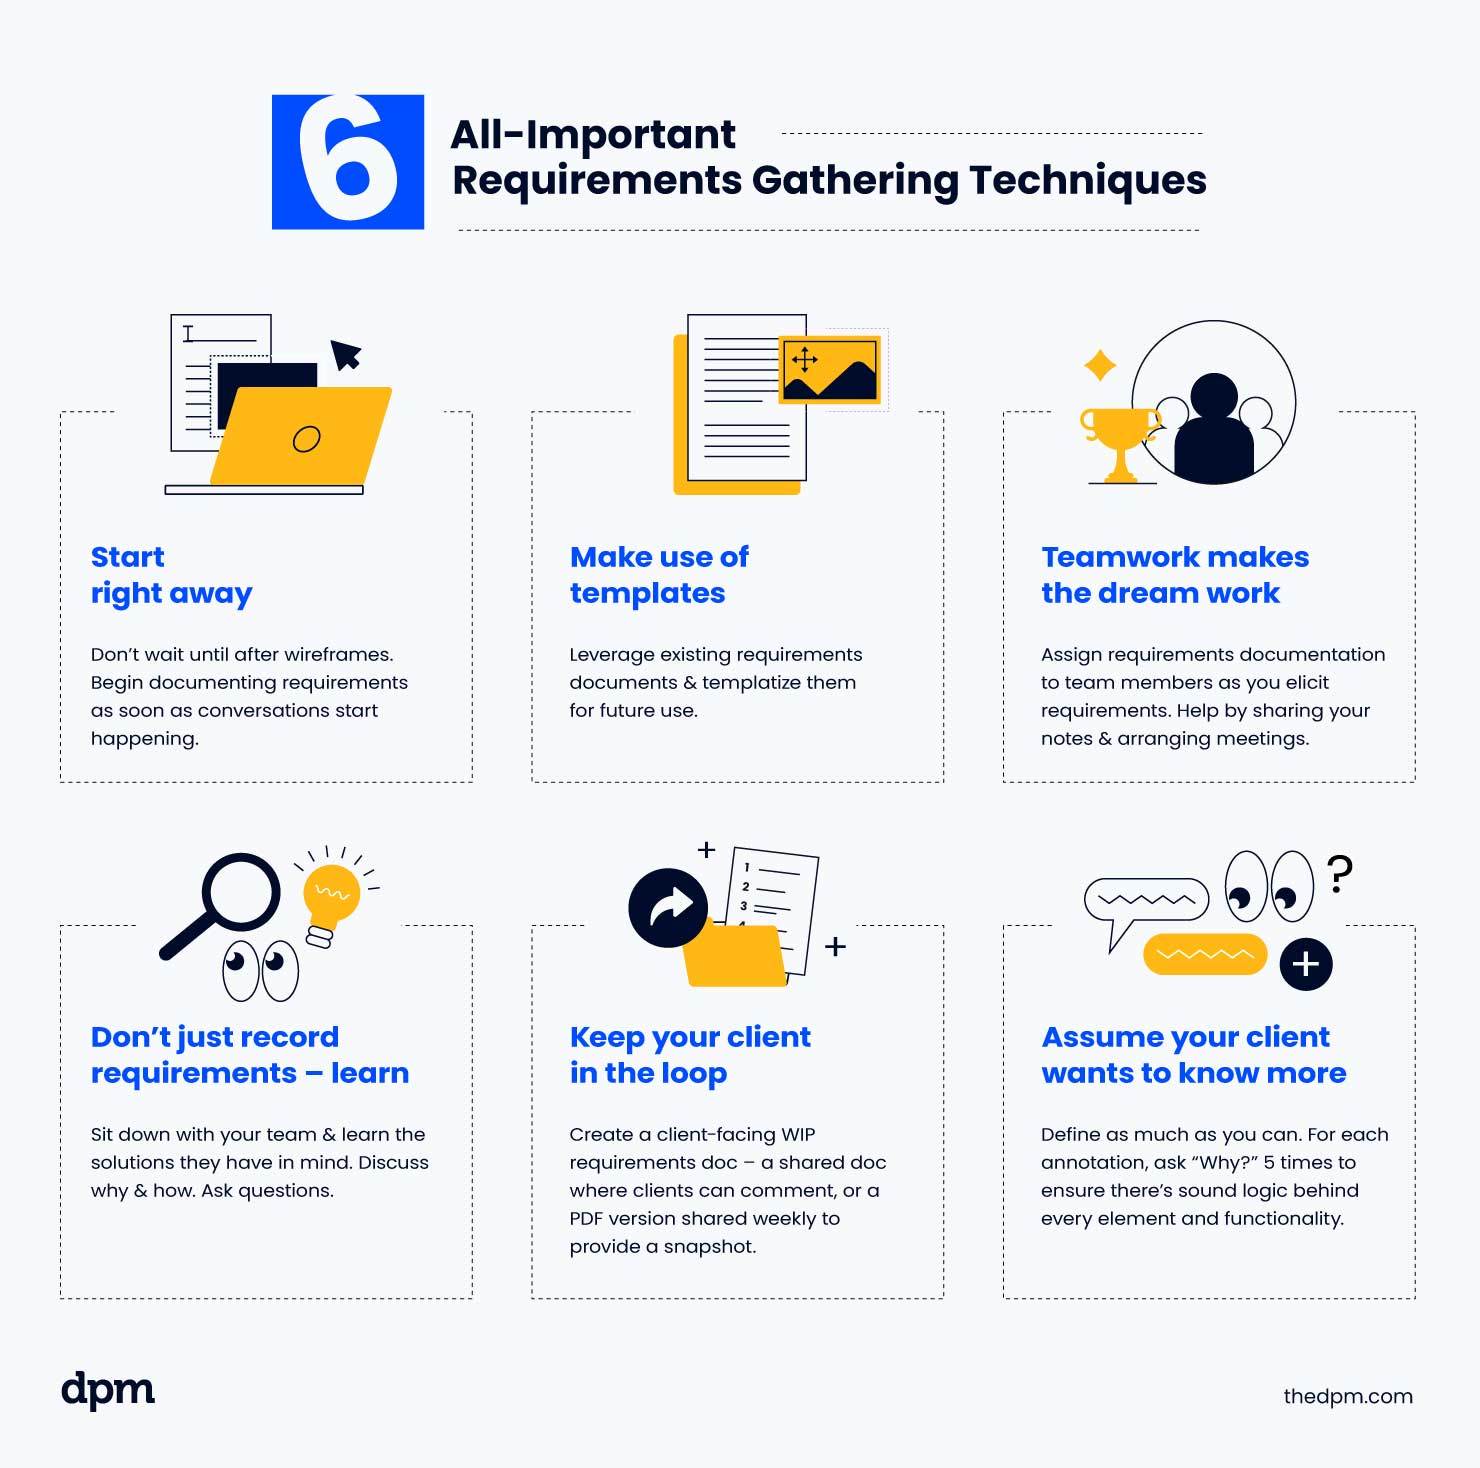
1. Start right away
Requirements documentation should begin as soon as conversations start happening, before you've nailed down the exact project plan or project goals. Capture everything you can and then pare it down. Here are some strategies you can try with your client:
- Send them a questionnaire about what they'd like to see in the project
- Conduct a brainstorming session
- Hold a focus group
Rather than removing information from the document, categorize it into what's included and what's not included—this avoids client assumptions later down the road.
You’ll be able to pull out your WIP (work in progress) requirements documentation and point out where that information was captured, why it may not be included, the logic behind the decision, and the date this was captured, making it traceable.
2. Make use of templates
Once you have a few requirements documents under your belt, start leveraging them and templating them for future use on other projects. Especially if you have a specific focus on e-commerce or learning applications projects, you’ll start seeing the functionality patterns surface. Identify where you can repurpose.
3. Teamwork makes the dream work
If there are different types of team members on a project, the requirements for each area of expertise may be authored by the respective experts.
In many cases, the conversation about requirements is a winding trail of phone calls, various separate meetings and conversations, etc. This is why it is critical that you assign out requirements documentation to respective team members as you go about requirements elicitation and compilation.
4. Don't just record requirements—learn
Do more than take notes. Expect more than resources emailing you a wall of text comprising their portion of the requirements. Take the time to sit down with your team of developers and learn the solutions the team has in mind for implementation. Discuss why and how. Ask questions.
Before you say, "But we only have so much time in the day—and what about the budget?", understand this: if a solution you’re working on is applicable to more than one project, then this additional time for getting an understanding does not necessarily need to be billable. You're growing your subject matter expertise that directly improves your day-to-day work.
5. Keep your client in the loop
Have an internal requirements document as well as a client-facing WIP requirements document. In the internal document, you can be less worried about including more transparent notes.
If you're not dealing with sensitive information, you can create this shared space through a Google Doc, with permissions enabled for the client to comment. If you are dealing with sensitive information, share a version of the requirements document on a weekly basis to provide a client a snapshot of what's been captured.
6. Assume your client always wants to know more
Rather than running the risk of assuming your client knows more than they do (then having that burn you later), assume your client always wants to know more. For each annotation, ask yourself “Why?” five times to ensure thoroughness of each requirement.
Asking yourself “Why?” five times for each requirement challenges you to really consider the logic behind every element and functionality of each page type. You may be surprised with how much you learn (or realize you need to learn).
3 Expert Tips on Writing a Project Requirements Document
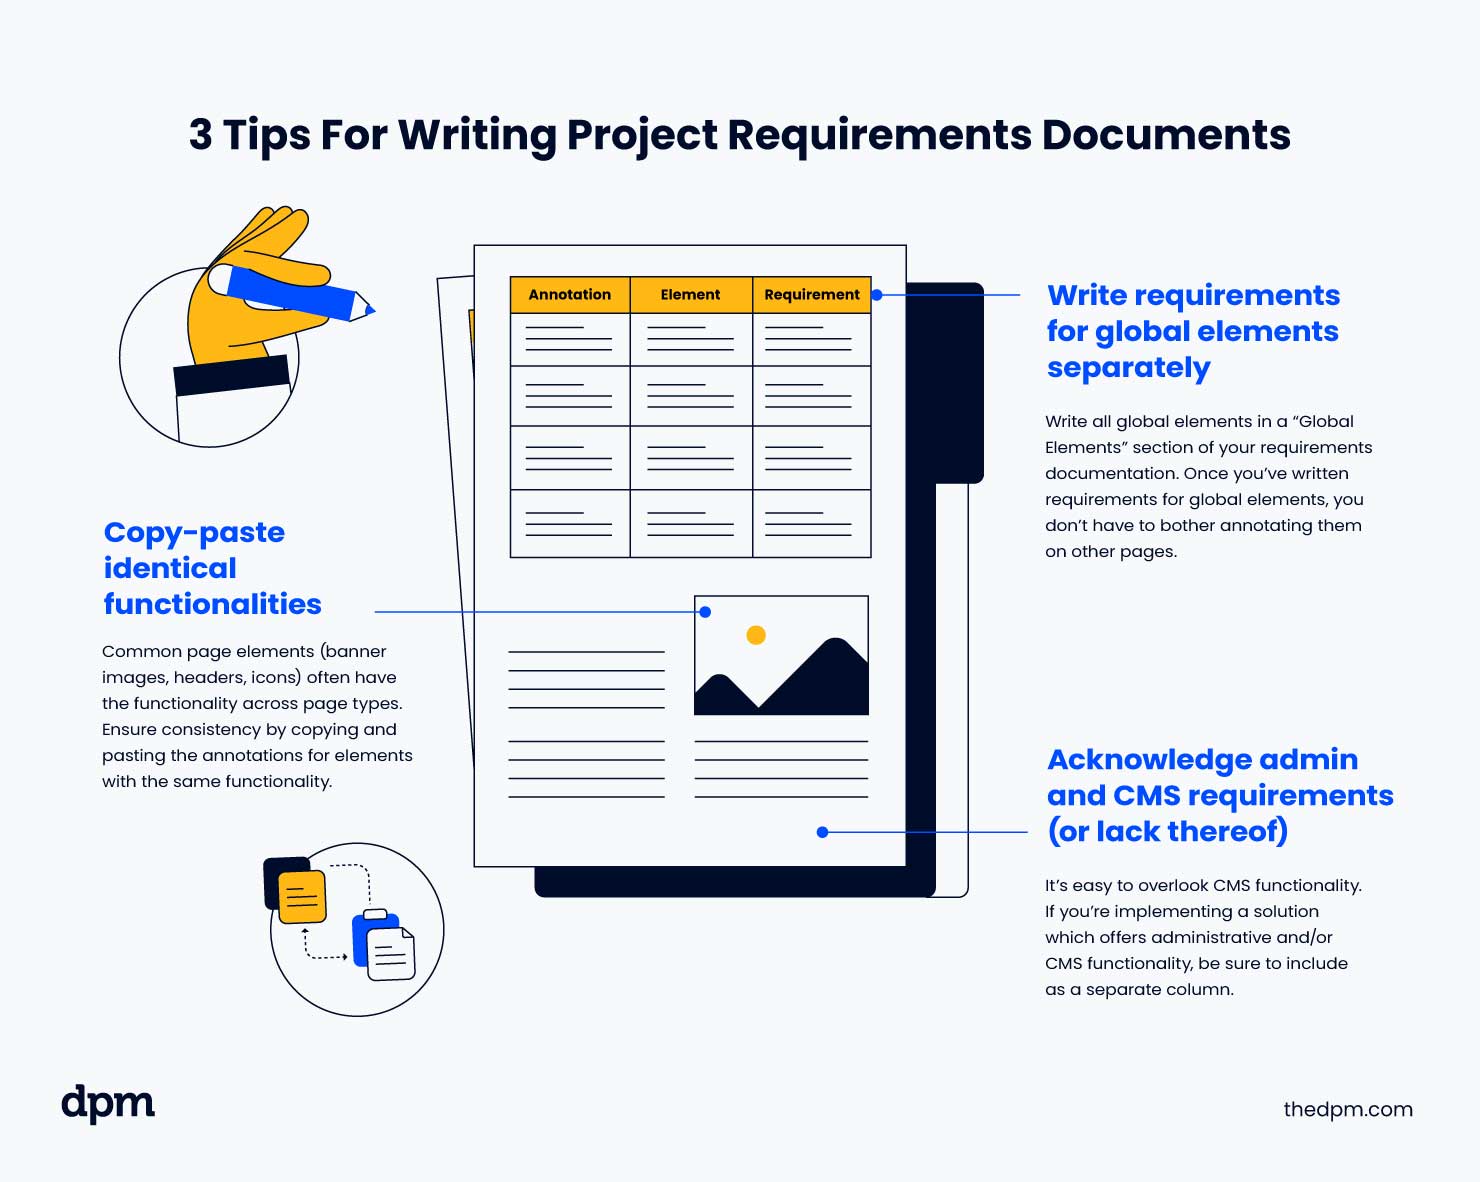
1. Write requirements for global elements separately
To eliminate redundancy, cover all global elements in a “Global Elements” section of your requirements documentation. This is applicable for global elements such as your main navigation menu items, anything within your global header, and anything within your footer.
Once you’ve written requirements for these global elements, do not bother annotating them throughout the other pages; only annotate elements specific to those pages.
2. Copy-paste identical functionality to ensure consistency
This is merely a tip to keep in mind for your (and your client’s) sanity. You’ll see this most with common page elements such as hero/banner images, headers, or “back” icons—among a large number of repeated functionality across page types (not to be confused with global elements).
3. Acknowledge admin and CMS (or lack thereof)
When we are so focused on functionality of each page element, it is easy to disregard administrative and/or CMS functionality. If you’re implementing a solution which offers administrative and/or CMS functionality, be sure to include this as its own column in your requirements. Example below:
Requirements Document Template [Download]

The specifics of your requirements definition will depend on your relationship with the client, your team’s experience, and other factors.
However, you’ll still need the basic parts of a project requirements document that gives definition to a feature’s functionality, location, design, etc. Here’s our requirements document template (you’ll need to be a member to access it):
Unlock Speed With 100+ Premium Templates
Become a DPM member to get access to endless expert-created templates to help you work faster and more efficiently.


