Project Closure Guide: Steps + Checklist

A clear project closure process helps you avoid common post-launch problems like unresolved issues, missing approvals, undocumented changes, unclear ownership, and incomplete handoffs.
This guide breaks project closure into 10 practical steps you can follow as a repeatable process to consistently close projects and keep post-project work organized.
What Is Project Closure?
The project closure phase is the last phase in the project life cycle, and it officially puts an end to a project. It involves meetings and communication with your team and stakeholders, a handful of project documents, and analysis skills.
It includes verifying deliverables, resolving outstanding tasks, finalizing documentation and payments, gathering feedback, reviewing project performance, and documenting lessons learned.
Why Is Project Closure Important?
Project closure is important because:
- You glean at least 2 things (usually more) that you can take with you to future projects to make them more successful.
- You minimize the chance of problems resurfacing on this project down the road and slowing you down.
- You create the opportunity for your team to tweak their process and structure before moving on to the next project.
- You’ll end up with a final project closure report that helps you make updates to your portfolios, processes, and assets.
When Should I Begin The Project Closure Process?
You should begin the project closing process after the following have been completed:
- Your team has done QA and performed testing on the project deliverables
- You’ve delivered the project, and the client has reviewed and approved it
- The thing you’ve delivered is live
If you don’t have the budget for the type of project wrap-up I cover in this article, it’s always helpful if there’s a billing bucket for overhead per client so you can still show that you’re doing work for them while not adding hours to the project budget.
Pro tip: If you don’t have the option to bill to overhead, admin, or any other non-billable bucket, try to ensure that you have time built in at the beginning of the project to cover project closure. If you get to the end of the project and there’s no way to account for the hours needed to follow all of the closure steps, prioritize what will be most helpful to you, the team, and your company.
10 Steps To Close A Project Successfully
Use the following project closure steps to wrap up your projects systematically and avoid leaving behind unresolved issues, missing approvals, or operational gaps. Here's a quick overview before we dive deep into all the steps:
| Project Closure Step | Overview | Outcome |
|---|---|---|
| Conduct post-launch testing | Verify the live product is stable after deployment and monitor for launch-related issues | Stable production environment with major issues identified early |
| Review outstanding tasks and loose ends | Identify missed items, postponed tasks, and unresolved work before closing the project | Clear understanding of remaining in-scope and out-of-scope work |
| Finalize project documents, contracts, and payments | Complete administrative, financial, contractual, and documentation-related closure tasks | Fully closed project records, contracts, and payments |
| Communicate project closure internally | Inform the team about closure timelines, responsibilities, and remaining follow-up work | Team alignment on final tasks and project closure activities |
| Conduct team retrospectives and capture lessons learned | Review project successes, failures, and operational insights with the team | Documented lessons learned and process improvements |
| Close the project with the client | Complete client handoff activities, communicate final updates, and request feedback | Successful client handoff and formal project closure |
| Review project performance | Evaluate project results against timelines, budgets, KPIs, and business goals | Clear understanding of project performance and outcomes |
| Create a roadmap for future improvements | Turn project insights and opportunities into a plan for future enhancements | Prioritized roadmap for future work or optimization |
| Update your credentials and portfolio | Update professional records and company portfolio materials with completed project details | Accurate project records and updated portfolio assets |
| Celebrate the team | Recognize team contributions and celebrate project completion | Improved morale and team recognition |

Step 1: Conduct Post-Launch Testing
Goal: Make sure the project is stable.
Before closing the project, confirm the live product is functioning correctly and monitor for issues that may appear after deployment. Here's how to:
- Refresh and check the live product: Test the live environment immediately after deployment to confirm everything transitioned properly from staging to production.
- Continue checking the product after launch: Monitor the live product every few hours during the first 24–48 hours, since unexpected issues often appear after launch.
- Monitor analytics and traffic: Watch analytics, traffic patterns, and server health for warning signs that may indicate deployment or performance issues.
- Create a checklist of high-risk features: List the features most likely to be affected during deployment, especially:
- Critical product functionality
- Core selling points
- Frequently used features
- Features that caused problems in the past
- Retest major functionality with your team: Divide important features among team members and retest them in the live environment to identify issues that did not appear during QA.
- Monitor social channels for complaints or bugs: Watch Facebook, Twitter, and other customer-facing channels for user-reported issues after launch.
- Set up Pingdom or other monitoring tools: Configure alerts so your team is notified immediately if downtime or performance issues occur.
Step 2: Review Outstanding Tasks And Loose Ends
Goal: Tie up all loose ends.
As projects move toward launch, lower-priority tasks and minor details can get pushed aside in order to hit deadlines. Before closing the project, review your plans, timelines, and task lists carefully to make sure nothing important was missed or forgotten. Check the following:
- Track delayed tasks throughout the project: Set up notifications or reminders for postponed items so lower-priority tasks do not get forgotten during delivery.
- Review delayed items during downtime: Revisit postponed tasks whenever the project slows down, or major deliverables are completed.
- Audit your plans and timelines for missed work: Go through every part of the project plan, timeline, and task list to identify anything that may have been skipped during the push to launch.
- Catalogue forgotten or incomplete items: Create a clear list of unfinished tasks, missed deliverables, or partially completed work before closing the project.
- Discuss unresolved items with your team: Meet with your team to confirm whether outstanding items still need attention and determine the best next steps.
- Be transparent with the client about missed items: Share any unresolved work openly with the client instead of hoping it goes unnoticed after launch.
- Collect client feedback on outstanding work: Confirm which unresolved items the client wants addressed immediately and which items can wait until after launch.
- Separate in-scope and out-of-scope requests: Review leftover tasks and determine whether each item belongs within the original project scope or should be treated as future enhancement work.
- Create a plan for unresolved in-scope work: Document how and when your team will complete any remaining in-scope deliverables.
- Document out-of-scope opportunities for future phases: Share out-of-scope items with the client as potential updates, enhancements, or future project work.
Step 3: Finalize Project Documents, Contracts, And Payments
Goal: Make sure the project is closed properly from an administrative perspective.
Before formally closing the project, organize documentation, confirm approvals, close contracts, and complete financial and administrative cleanup tasks. Conduct the following steps:
- Organize and archive project files: Confirm your team stored files in the correct repositories, servers, or document management systems. Archive outdated assets and clearly label final versions.
- Update documentation and project records: Make sure code is commented, documentation is complete, and project records reflect the final state of the project.
- Review project logs and reporting: Go through your assumption log, change log, issue log, and risk reports to identify unresolved items and document important project insights.
- Verify scope completion and deliverable approvals: Review scope documents, deliverables, and stakeholder sign-offs to confirm all agreed work was completed and approved before closing the project.
- Collect signatures and approvals: Check contracts, approvals, and project documents for missing signatures or sign-offs before archiving the project.
- Close out contracts and payments: Confirm supplier, subcontractor, and vendor agreements are complete and verify invoices, receivables, commissions, bonuses, and payables have all been processed correctly.
- Complete administrative cleanup: Reassign personnel, transfer equipment or assets where needed, update final project records, and archive important project information for future reference.
Step 4: Communicate Project Closure Internally
Goal: Explain the closure plan to your team.
Before closing the project completely, communicate next steps clearly so your team understands remaining responsibilities, closure activities, and any follow-up work after launch. Here's what to do:
- Write a personalized team closure message: Recognize each team member’s contributions instead of sending a generic wrap-up email. Mention specific accomplishments and contributions where possible.
- Explain outstanding tasks and follow-ups: Outline unresolved issues, remaining work, or post-launch responsibilities so everyone understands what still needs attention.
- Clarify ownership and next steps: Confirm who is responsible for handling final updates, maintenance items, support requests, or future follow-up tasks after project closure.
- Share closure timelines and activities: Let the team know about retrospective meetings, post-mortems, celebrations, or other planned wrap-up activities.
Step 5: Conduct Team Retrospectives And Capture Lessons Learned
Goal: Learn from successes and failures.
Once the project is operationally closed, review how the project performed internally and identify lessons your team can apply to future work. Steps to follow:
- Hold a retrospective or post-mortem meeting: Meet with your full team to discuss what went well, what went wrong, and what should be improved on future projects.
- Ask the team for discussion topics beforehand: Collect agenda items in advance so your retrospective addresses the most important operational, technical, and communication issues.
- Review both successes and failures: Discuss positive outcomes alongside project challenges so your team can repeat successful processes instead of focusing only on problems.
- Collect anonymous team feedback: Use surveys to gather honest feedback from team members who may not feel comfortable raising concerns openly during meetings.
- Keep feedback collection simple and structured: Use straightforward questions with room for optional comments so responses are easier to review and compare.
- Document lessons learned clearly: Compile retrospective findings, team feedback, and operational insights into a lessons learned document that your team can reference on future projects.
- Archive lessons learned for future use: Store retrospective documentation, survey findings, and process recommendations in a shared location your organization can access later.
Step 6: Close The Project With The Client
Goal: Fill your client in on anything outstanding and all things finished.
Before formally closing the project, make sure the client has everything they need and understands the final status of the project, including any unresolved items, future opportunities, or post-launch expectations. Here's how to close out:
- Communicate lingering issues clearly: Update the client on any unresolved items, expected post-launch issues, or remaining follow-ups so there are no surprises after project closure.
- Transfer important project information: Share useful links, documentation, login credentials, and any other resources the client will need to manage the product after handoff.
- Send final invoices and financial updates: Confirm the client received all final invoices and understands the status of outstanding payments or approvals.
- Discuss post-launch support and future opportunities: Review maintenance needs, deferred scope items, or possible future phases if the client expresses interest after project closure.
- Schedule a client wrap-up meeting: Hold a final meeting or conference call so the client can ask questions, review the project outcome, and close the engagement collaboratively.
- Request client feedback: Send a feedback form or follow-up email asking the client about their experience working with your team, and review the responses internally once received.
Step 7: Review Project Performance
Goal: Summarize what worked and what didn’t with your project.
Once the project is complete, review overall performance to understand how well the project delivered against expectations, objectives, and business goals. Here are some tips:
- Compare estimates against actual results: Review budgets, timelines, hours worked, and delivery expectations to identify gaps between projected and actual performance.
- Discuss project challenges and solutions: Analyze failures, blockers, and workflow issues and document how your team resolved them during delivery.
- Measure project performance against objectives: Review KPIs, analytics, conversion data, user feedback, and business goals to determine how successfully the project is performing after launch.
- Identify optimization opportunities: Use project data and stakeholder feedback to uncover opportunities for improvements, enhancements, or future iterations.
Step 8: Create A Roadmap For Future Improvements
Goal: Turn project insights into a plan moving forward.
After reviewing project performance, use what you learned to create a roadmap for future enhancements, optimizations, or additional project phases. Here's how:
- Compile project insights and findings: Gather data from retrospectives, analytics, client feedback, issue logs, and performance reviews to identify improvement opportunities.
- Prioritize opportunities strategically: Focus on the importance and long-term impact of changes instead of reacting only to urgent requests or quick fixes.
- Start with quick wins: Identify smaller improvements that can deliver immediate value before planning larger enhancements or optimization initiatives.
- Build an actionable roadmap: Organize improvements into a clear sequence of work that considers timelines, budgets, dependencies, and client priorities.
- Review the roadmap with your team and client: Collect feedback, refine priorities, and confirm alignment before moving into implementation or future project phases.
- Transition roadmap items into future work: Treat approved enhancements, optimization efforts, or content initiatives as new projects with their own planning and delivery process.
Step 9: Update Your Credentials And Portfolio
Goal: Make sure your professional records reflect the completed project.
Before fully moving on from the project, update your personal and company records while project details and accomplishments are still fresh.
- Update your personal credentials: Add the project to your resume, LinkedIn profile, or other professional records while the details, metrics, and accomplishments are still easy to recall.
- Document important project outcomes: Capture notable achievements, lessons learned, results, or performance metrics that may be useful for future case studies or interviews.
- Update your company portfolio and marketing assets: Add the completed project to your company website, portfolio, presentations, or internal showcase materials where appropriate.
- Archive supporting visuals and documentation: Save screenshots, reports, visual assets, and project summaries your team may want to reference later for sales, marketing, or operational purposes.
Step 10: Celebrate The Team
Goal: Let your team know they are valued.
Project closure is also an opportunity to recognize the effort your team invested throughout the project and celebrate the work completed together. Make sure to:
- Recognize individual contributions personally: Thank team members for the specific ways they contributed to the project instead of relying on a generic congratulations message.
- Send a personalized note or small gift: Consider sending thank-you cards, small gifts, team lunches, or happy hour invitations to acknowledge the team’s hard work.
- Celebrate project completion together: Create space for the team to reflect on the accomplishment and close the project on a positive note before moving to new work.
Project Closure Checklist [Download]
In DPM Membership, there’s a project closure checklist that follows all of the steps in the project closing process that I laid out in this article.
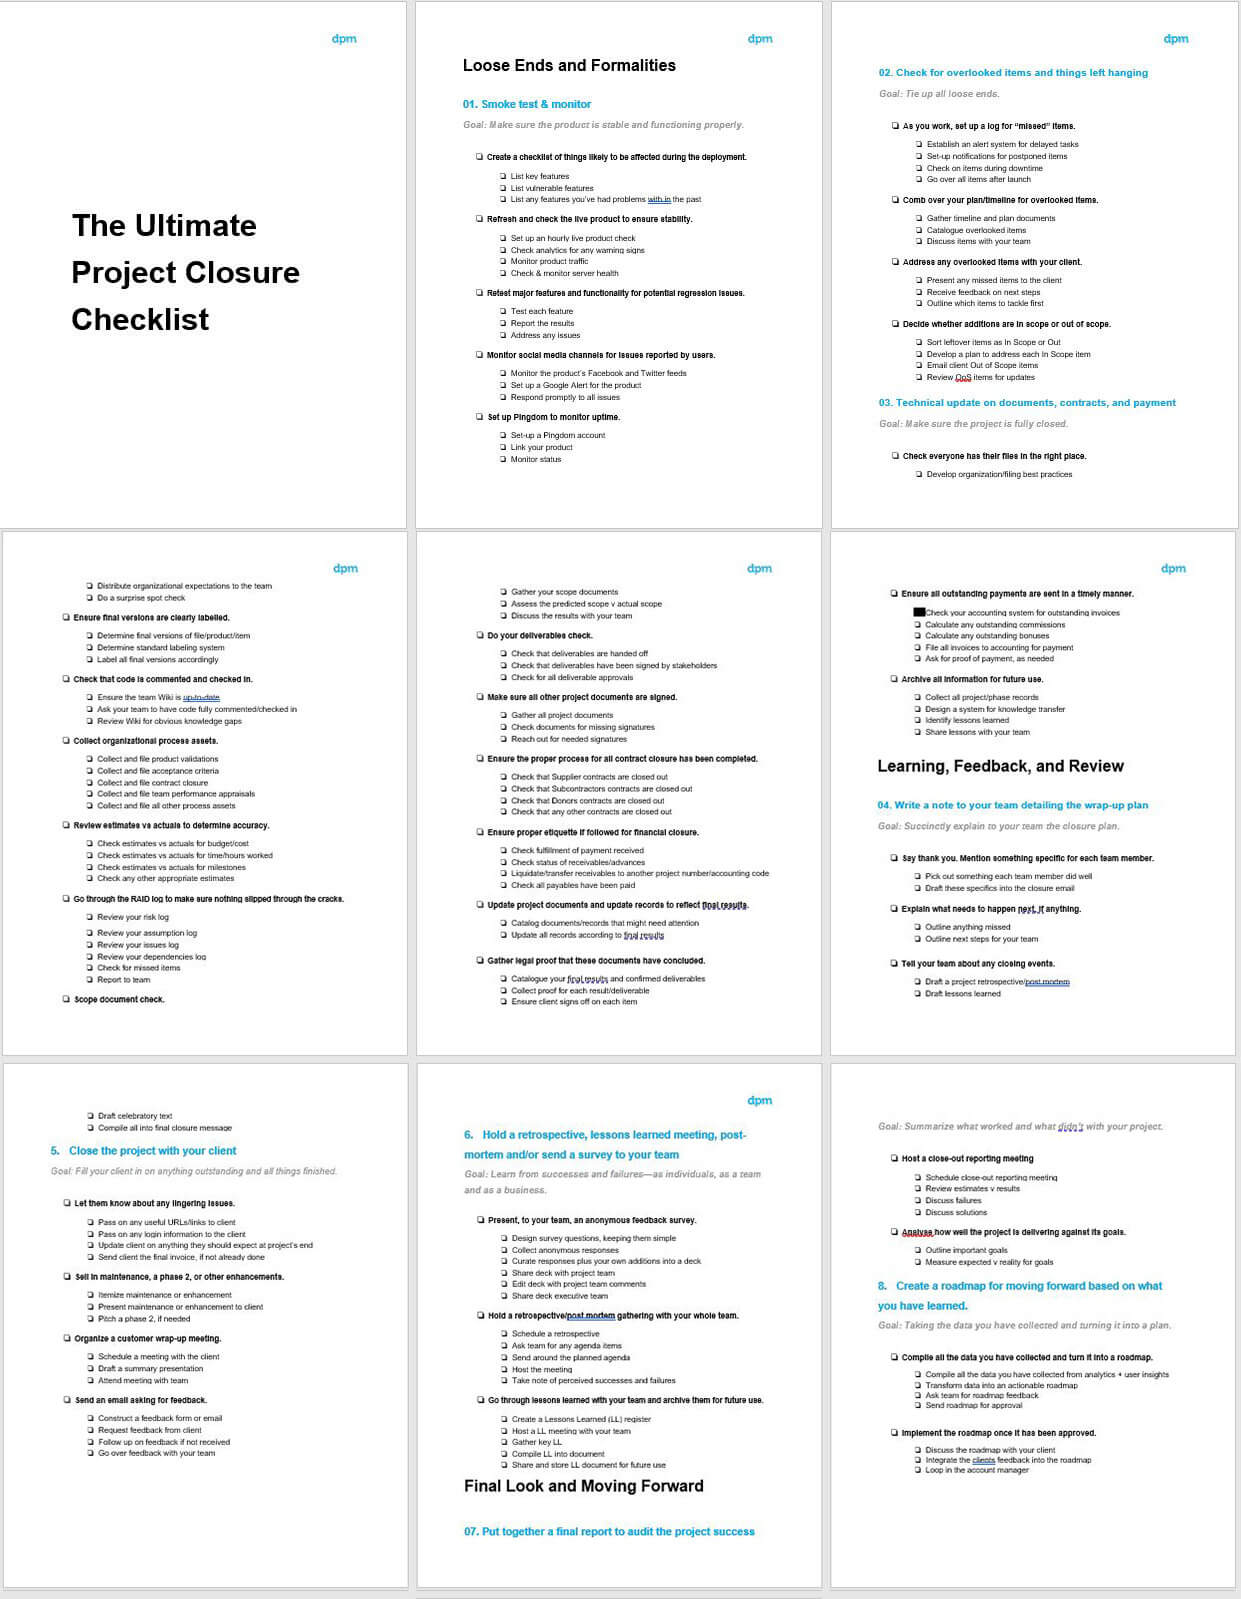
The checklist goes through the main phases but also breaks down each phase into a list of subtasks for you to check off during project closeout. DPM Members get access to the checklist, plus 100+ other templates, lists, samples, ebooks, workshops, and more.
How To Avoid Scope Creep During Project Closure
The statement of work should clearly define when a project is complete, and all in-scope deliverables are delivered.
When the immediate bug fixes are complete, it’s important that we don’t start adding in last-minute feature requests.
Some of the biggest mistakes are made trying to make quick fixes to a project in the days just after it has gone live when clients start panicking and changing their minds about things! Invariably, this kind of botch job leaves the site user experience or design severely compromised. Knee-jerk changes are never thought out properly and contribute to scope creep!
Other Considerations For Project Closure
In some teams, project closure requires some accounting updates or possibly documentation requirements that apply in some verticals.
There could be any number of things that the project manager is required to do at the end of a project that you might not think to do. You should already have a good sense of what is required, but if you’re not sure what is expected of you, ask about things like specific accounting updates or documentation requirements.
FAQs
What Happens If I Skip Project Closure?
If you skip a project closure or don’t close a project properly, you might set yourself and your company up for some tough situations. For example:
-
- A client could come to you well after a project is over, complaining that items were not completed
-
- Your team realizes that some critical component of the product was missed
-
- Your team carries the same recurring issues onto new projects
It is definitely in your best interest to have a project closure procedure in place so that you cover every base and safely archive it in your project management software.
What Are The Types Of Project Closure?
There are several types of project closure depending on how the project ends. Here are the most common types:
| Type Of Closure | Description |
|---|---|
| Normal closure | The project is completed successfully and all deliverables, approvals, and documentation are finalized as planned |
| Premature closure | The project ends early because of budget cuts, changing priorities, resource limitations, or external factors |
| Perpetual closure | The project continues indefinitely without clear closure criteria or a defined endpoint |
| Failed project closure | The project cannot meet its objectives or deliver the expected outcomes but still requires formal administrative closure |
What Is The Difference Between Project Closure And Project Completion?
Project completion means the project work itself is finished. Deliverables have been created, approved, or launched.
Project closure happens after completion and focuses on formally wrapping up the project operationally and administratively.
| Project Completion | Project Closure |
|---|---|
| Focuses on finishing deliverables | Focuses on formally closing the project |
| Happens at launch or delivery | Happens after delivery |
| Confirms work is completed | Confirms operational, financial, and administrative closure |
| Usually tied to production release | Usually tied to approvals, reporting, and archiving |
Who Is Responsible For Project Closure?
The project manager usually owns the project closure process and coordinates closure activities across the team.
However, project closure often involves multiple stakeholders, including:
- Finance teams
- Operations teams
- QA teams
- Department leads
- Project sponsors
- Vendors
- Clients
The project manager is responsible for making sure closure tasks are completed, documented, communicated, and approved before the project is archived.
What Is Included In A Project Closure Report?
A project closure report summarizes the final status, outcomes, and performance of the project.
A project closure report typically includes:
- Project objectives and deliverables
- Final project status
- Scope summary
- Timeline and budget performance
- Outstanding issues or risks
- Stakeholder approvals and sign-offs
- Lessons learned
- Project successes and challenges
- KPI or performance results
- Recommendations for future work
How Long Should Project Closure Take?
Project closure timelines depend on the size and complexity of the project.
| Project Type | Typical Closure Timeline |
|---|---|
| Small internal projects | A few days |
| Medium-sized client projects | One to two weeks |
| Large enterprise or multi-vendor projects | Several weeks |
What Is The Difference Between Project Closure In Agile And Waterfall?
In waterfall projects, project closure usually happens at the end of the project after all planned phases and deliverables are completed.
On the other hand, in Agile projects, closure is often more iterative. Teams may complete closure activities at the end of releases, sprints, or delivery phases instead of waiting until the entire initiative is finished.
| Waterfall Project Closure | Agile Project Closure |
|---|---|
| Happens at the end of the project | Happens continuously across releases or sprints |
| Focuses heavily on formal sign-offs | Focuses heavily on retrospectives and iteration |
| Uses sequential approvals | Uses ongoing stakeholder feedback |
| Emphasizes documentation and contracts | Emphasizes continuous improvement |
How Do I Handle Gray Areas In Project Closure Criteria?
Gray areas usually appear when deliverables are technically complete but stakeholders disagree about whether the project is fully finished. The best way to reduce ambiguity is to define closure criteria early in the project.
If disagreements appear during closure:
- Review the original scope and requirements
- Document unresolved items clearly
- Separate in-scope work from future enhancements
- Confirm decisions with stakeholders in writing
- Assign ownership for post-launch follow-up items
What Are Common Project Closure Mistakes To Avoid?
One of the most common project closure mistakes is assuming the project is finished immediately after launch or delivery. Other common mistakes include:
- Skipping post-launch testing
- Failing to collect stakeholder sign-offs
- Leaving unresolved tasks undocumented
- Not communicating ownership after handoff
- Forgetting to archive documentation
- Skipping retrospectives or lessons learned
- Delaying invoicing or financial closure
- Failing to document out-of-scope work
- Not reviewing project performance against KPIs
- Closing the project without client feedback
What's Next?
To get access to 100+ templates, samples, and examples for other project management process, sign up for DPM membership. You'll also get access to community conversations in Slack with 100's of other digital project managers.

