How to Create a Project Timeline + Template

A project timeline helps keep everyone aligned on what needs to happen, when it needs to happen, and who is responsible for each task. It also improves planning and resource management by identifying dependencies, deadlines, and potential bottlenecks before they become major issues.
In this guide, I’ll walk you through how to build a project timeline and use it to keep your projects on track, plus tools and project timeline examples to help you grasp the concept.
What Is a Project Timeline?
A project timeline is a visual map that lays out all the tasks, milestones, and deadlines in a project from start to finish. It puts everything in chronological order, so you and your team understand what needs to happen, when, and in what sequence.
Project Timeline Template
If you don’t want to start from scratch and all you need is a template, here are a few of them! Mind you, these templates are exclusively available to members of our community.
Choose the one that fits your project type and methodology:
- Website Redesign Project Timeline (Gantt format): Great for visualizing major milestones like content development, UX, QA, and launch.
- Landing Page Project Timeline (Agile): Best if your team iterates fast and needs room for sprint-based flexibility.
- Landing Page Project Timeline (Waterfall): Perfect for step-by-step planning when each project phase needs to be completed before the next begins.
How to Create a Project Timeline
A solid project timeline is more than just a list of tasks and dates—it’s your first line of defense against missed deadlines and the ever-creeping dread of “Wait, when was that supposed to be done again?”
Here are the key steps to create a project timeline.
1. Understand Project Scope
Before you start dragging bars across a Gantt chart, step back and make sure you understand what you're building. A well-defined project scope is what gives your timeline integrity. It anchors your work, keeps expectations in check, and ensures that what you're planning is tied to what you're actually supposed to deliver.
Start by asking the big questions:
- What is the overall goal of this project?
- What are the major deliverables or outcomes?
- What does 'done' look like?
- What constraints are already in play? (Think budget, deadlines, resources, tools, etc.)
- What’s explicitly not included?
Then get into the details. Talk to stakeholders, dig through related documents, and look for anything that could create ambiguity later. You want to leave this step with a clear picture of what the project includes, what it doesn’t, and who gets to make decisions when scope questions inevitably come up. A formal project scope statement is the best way to get alignment.

2. Identify All Tasks and Activities
Identify the specific tasks, subtasks, and activities required to complete each deliverable. The more complete this list is, the more reliable your timeline will be.
Start with a work breakdown structure (WBS) and break each major deliverable into smaller, manageable components. Avoid writing things like “launch website” as that is a milestone, not a task. Instead, think about what it takes to get there: finalize content, approve wireframes, configure CMS, test mobile responsiveness, and so on.
Loop in the people who’ll be doing the work. Engineers, designers, operations leads—they know the details you might miss. And if they help shape the task list, they’re a lot more likely to buy into the timeline later.
Look for:
- Repeating workflows
- Handoff points between teams
- Tasks that are often overlooked (like internal QA or legal review)
- Anything that needs to happen in a specific order
This list will form the backbone of your Gantt chart. Each task you identify becomes a bar on the timeline, tied to start and end dates, dependencies, and assigned team members.
3. Estimate Time Needed for Each Task
Estimating task durations is one of the most deceptively difficult parts of building a timeline because humans are terrible at estimating.
Start with the basics:
- Ask the people doing the work how long they expect each task to take
- Look at similar past projects or performance data for reference
- Consider complexity, context, and the actual time people will have available (not just ideal conditions)
Most people estimate based on best-case scenarios, but your job as a project manager is to build in reality. That includes interruptions, review cycles, testing, unexpected roadblocks, and vacation schedules. Consider estimating a range: best case, worst case, and most likely. This lets you build a buffer and present different timeframe scenarios to stakeholders.
Once you have your estimates, start arranging them into your Gantt chart. Each task gets a start date, an end date, and a duration.
4. Map Dependencies
Most work depends on something else getting done—or at least started—before it can move forward. Mapping these dependencies is how you shift from a loose list of tasks to a functioning project timeline.
Look at your list and ask:
- What needs to happen first?
- Which tasks can happen at the same time?
- What’s at risk of creating a bottleneck if delayed?
Drawing relationships between tasks helps you visualize the flow of work and identify tasks that are time-sensitive or resource-dependent. This is also where you’ll start to uncover your critical path: the series of dependent tasks that directly determine your project’s finish date. If any of these slip, the whole project timeline moves with them.
For more complex projects, you might use a PERT chart to model dependencies, especially when you’re estimating best-case, worst-case, and most-likely timelines. PERT helps you analyze the logic behind the sequence, while Gantt helps you see it on a calendar.
5. Put Tasks in Order
Now that you’ve mapped out dependencies, it’s time to organize your tasks into the actual sequence they need to happen. On your Gantt chart, place each task in its appropriate position on the timeline, based on when it can start and how long it’s expected to take. Tasks with no dependencies can start right away. Others will follow in sequence, and some will run in parallel.
This is also where you test the logic of your plan. If Task A must be done before Task B starts, but Task A finishes the day after Task B is scheduled to begin, something’s off. You also need to consider team availability, holidays, and any immovable project milestones.
6. Assign Tasks & Set Deadlines
Once your tasks are ordered, collaborate with the team to assign each one to the right team member or role and lock in the due dates. Look at capacity, not just job titles—who actually has the time and skill to do the work when it needs to happen? Be realistic. Overloading your high-performers may look efficient on paper, but it’s how timelines quietly implode.
Work with your team to allocate every task clearly, and confirm that each person understands what’s expected, when it’s due, and what might block their progress. Don’t leave room for interpretation here—if two people think they’re sharing ownership, no one’s really driving.
Set realistic deadlines based on the durations and dependencies you’ve already mapped. Build in buffer time for reviews, feedback, and the inevitable “this took longer than expected” moments. A task that ends on Friday and kicks off a critical task Monday leaves no room for error.
7. Share the Timeline
Share the final project management timeline in a format that’s accessible and easy to digest. That might mean an interactive Gantt view in your project management tool, a PDF snapshot for leadership, or a simplified PowerPoint slide for external stakeholders. Choose the right level of detail for each audience, but don’t change the plan to make it prettier.
Make it clear where people can find the timeline, how often it will be updated, and what’s expected of them in terms of tracking progress or flagging risks. If your project is moving fast, consider setting up a real-time view so no one is stuck chasing the latest version.
And don’t just distribute it—walk people through it. Host a short review session to highlight key milestones, dependencies, and critical paths. This is where you confirm alignment and head off confusion before it slows you down.
Tools for Managing the Project Timeline
There’s no shortage of project management tools and project scheduling software that can help you build, update, and share your timeline in real time.
Most modern timeline tools offer a Gantt chart view, timeline view, and drag-and-drop ease for scheduling. Many also support task dependencies, notifications, and real-time teamwork—so when one deadline shifts, everything else adjusts automatically.
Here are some examples:
Clicks on the links below may earn a commission, which supports our independent testing and review of software and services. Learn more about how we stay transparent.


Difference Between Project Timeline and Project Schedule
Project timelines are high-level overviews that show the flow of work over time (what needs to happen and when), and project schedules are more detailed plans that include exact dates, durations, assigned resources, and task dependencies.
Timelines are better for communicating with stakeholders and aligning your project team, while schedules are for managing the fine-grain details of execution.
Here’s a simple way to consider the difference:
| Project Timeline | Project Schedule | |
|---|---|---|
| Level of Detail | High-level | Detailed |
| Primary Audience | Stakeholders, cross-functional teams | Project managers, team leads |
| Format | Gantt chart, Kanban, visual roadmap | Spreadsheet or Excel doc, scheduling tool, task list |
| Focus | Milestones, sequencing, overall flow | Durations, resources, deadlines, dependencies |
| Updates | Weekly or milestone-based check-ins | Daily or real-time adjustments |
Benefits of Project Timelines
Here are a few benefits of using project timelines:
- Clarity for everyone: A project timeline makes it easy for anyone (regardless of role or project involvement) to understand how the work unfolds. It’s a quick reference for what’s in motion, what’s coming next, and what’s already done.
- Stakeholder sanity: When stakeholders can see the flow of work and key milestones, they’re less likely to panic, micromanage, or surprise you with last-minute requests. A visual timeline of your project plan helps manage expectations and avoid frantic emails and phone calls. This clarity is a key part of stakeholder management.
- Motivation through milestones: Long projects get tiring. Breaking them into visible milestones gives teams natural points to pause, celebrate, and regroup before moving forward again. Even if you aren’t at the final stage, there is something worth celebrating along the way.
- Early detection of risks: When all your individual tasks are laid out in order, it becomes easier to spot overlaps, resource conflicts, and sequencing issues before they become real problems.
- Better cross-functional collaboration: A clear timeline makes it obvious when one team’s output is another’s input. That visibility helps reduce handoff confusion and encourages more proactive communication between departments.
Types of Project Timelines
Below are some of the most common formats for project timelines and how they actually function in the real world. Not all of the below are truly timelines, but you’re likely to come across some combination of these throughout the life of your entire project.
Gantt Chart
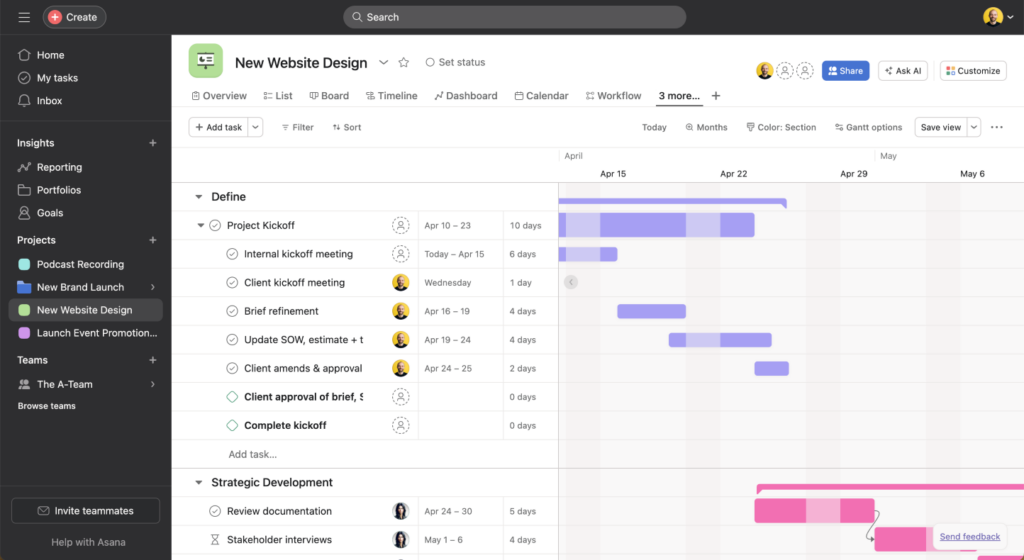
A Gantt chart is a bar chart that displays tasks along a horizontal timeline, showing their start and end dates, durations, and dependencies. It's ideal for complex projects with multiple phases—think software development, construction, or event planning. With a Gantt, you can track how project tasks stack, overlap, and shift based on progress or delays.
Kanban Board
A Kanban board is not so much a project timeline as it is a method to organize work visually using columns that represent each stage of your process—this typically includes “backlog,” “to do,” “in progress,” and “done.” It’s dynamic, flexible, and perfect for teams that value speed and transparency over long-range forecasting.

Unlike time or date-based charts, Kanban project management doesn’t focus on deadlines—it focuses on flow. You move cards across the board as tasks progress, which makes it incredibly easy to spot bottlenecks, balance workloads, and manage project progress in real time.
Critical Path
The critical path is the shortest path to get the project done. It identifies the essential tasks that directly impact your end date—if any one of them slips, the whole project moves with it. No buffer, no wiggle room.
This method is particularly useful for complex or tightly scheduled projects where timing is everything. It helps you prioritize where to focus attention, escalate blockers early, and make informed trade-offs when something unexpected happens (and let’s be real—something always does).
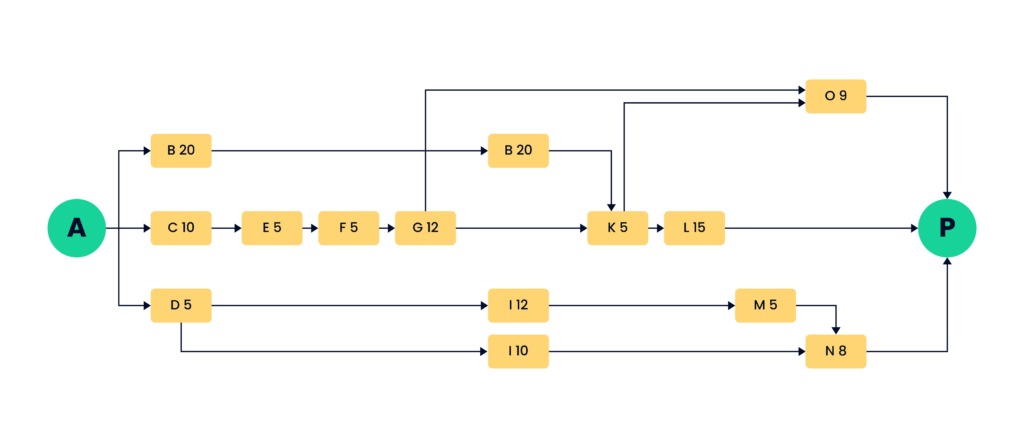
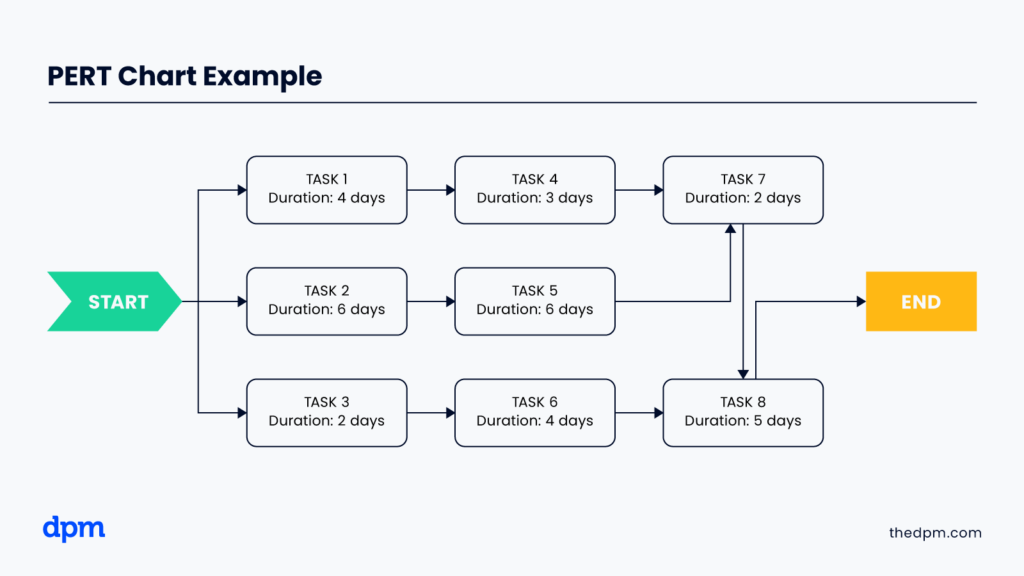
PERT Chart
A PERT (program evaluation and review technique) chart is a planning tool that helps you visualize the sequence and timing of interdependent tasks (similar to how you could use the critical path visualizations). It uses nodes and arrows to show the relationships between activities and calculates the earliest possible completion date by evaluating all possible paths through the project.
Unlike a Gantt chart, which is time-based and visually linear, a PERT chart is more about logic and flow. It’s often used in engineering, R&D, or other highly structured environments where task dependencies are non-negotiable and estimating accurate task durations is critical.
Historical Timeline
A historical timeline is used to document key events in sequential order, typically after a project wraps (or after a major phase ends), to reflect, report, or learn. While it’s not a tool for active task management, it’s incredibly useful when you need to tell the story of a project: what occurred, when, and in what context.
Vertical Chart
A vertical timeline stacks milestones or phases from top to bottom. It’s a great fit when you want to show major steps in a project without going deep into task-level detail.
This style shines in executive briefings, proposals, or project kickoffs where high-level clarity matters more than granular precision. It’s not ideal for task management, but it’s great when your audience wants to understand what’s happening without getting into the weeds.
Best Practices for Managing Project Timelines
These best practices will help you keep your project on track, your team informed, and your plan adaptable when (not if) things change.
- Revisit your timeline weekly: A great timeline is a working document. Review it every week to make sure it reflects the reality of the project. If yours is collecting dust or only being touched by you, it’s not doing its job. Make it collaborative, not just presentable.
- Build in buffer time: Almost nothing goes exactly as planned. Give breathing room between project milestones and around tasks with high uncertainty. It’s easier to adjust to a flexible plan than recover from a rigid one.
- Make it visual: Use the timeline to tell a story. Highlight critical path tasks, call out risks, and use color or symbols to flag status. The best timelines are functional and scannable—no explanation needed.
- Keep task ownership clear: Every item should have a name next to it. Vague assignments are where delays and dropped balls creep in. If multiple people are responsible, clarify who’s driving and who’s supporting.
- Integrate the timeline into your workflow: Link your timeline to your project hub, dashboard, or weekly planning process. The more it’s part of how your team operates, the more valuable it becomes.
What’s Next?
Want to connect with other digital project managers to share resources and best practices? Join our membership community and get access to 100+ templates, samples, and examples and connect with 100s of other digital project managers in Slack.

