Workflow Process Mapping: How To Guide With Examples


Map to Efficiency: Workflow process mapping helps pinpoint inefficiencies and bottlenecks so you can streamline your work processes and reduce time wastage.
Save Time Later: While creating process maps demands initial time investment, it leads to significant time savings by helping you eliminate inefficient practices.
Tool Time: It's important to choose the right workflow management tools to help you overcome challenges and improve process efficiency; otherwise they'll slow you down.
Workflow process mapping is the best way to identify and fix inefficiencies, redundancies, and bottlenecks in the way you’re completing work within your organization. Creating accurate and complete maps requires some initial time investment, but cleaning up inefficiencies will save you a ton of time down the road.
Here’s how to do workflow process mapping, what types of maps you can use, and which workflow management tools can helpjar you overcome challenges and improve your processes.
What Is Workflow Process Mapping?
Workflow process mapping involves visually representing the steps involved in a particular process or workflow.
You’ll create diagrams to outline each step in a process, along with the relationships and dependencies between them, so that everyone can understand how work gets done. This technique is commonly used in manufacturing, healthcare, finance, and information technology, to name a few industries.
Why Use Workflow Process Mapping?
Workflow process mapping is important because it provides a clear workflow visualization that makes it easy to identify bottlenecks and inefficiencies in your process, streamline your operations, and continuously improve the way you and your team work.
Here are some of the other benefits of process mapping:
- Improves clarity for better decision-making and problem-solving
- Helps reduce costs
- Makes it easier to understand and communicate the process to team members and stakeholders
- Encourages teams to regularly review and optimize their workflows
Types of Workflow Process Mapping
These are some of the key types of process maps you might use for this process.
- Flowcharts: Flowcharts are created with simple shapes and arrows that represent the steps in a basic process and the relationships between them. It’s easy to create and understand a basic flowchart, so this is a good starting point for simple workflows.
- High-level maps: High-level process maps are used in the early stages of process mapping to gain a broad understanding of the workflow. It focuses on the major steps and key players so you can see the big picture and identify areas for process improvement.
- Detailed process maps: Detailed process maps provide a more in-depth view of the process and include inputs, outputs, and decision points. This makes it ideal for complex processes and for identifying specific areas for improvement and potential solutions.
- Swimlane maps: Swimlane diagrams or maps divide processes into lanes that represent a different team or department. This clarifies roles and responsibilities and makes it easier to identify handoffs and potential bottlenecks. It’s helpful for processes that involve multiple teams or departments.
- Value stream maps: Value stream maps offer a detailed view of a process and focus on the flow of materials and information. They’re common in manufacturing, supply chain management, and auto repair, and help identify and eliminate waste. Automotive project management software may also be helpful here.
- SIPOC diagrams: A SIPOC diagram focuses on suppliers, inputs, the process, outputs, and customers. They’re useful for understanding key elements of a process and identifying areas for improvement, and are often used in the early stages of workflow mapping to gain a broad understanding of the workflow.
Workflow Process Mapping Symbols
Here are some of the common workflow process mapping symbols you’ll use:
- Terminator: This symbol represents the start or end of a process. It’s typically an oval shape.
- Process step: This represents an individual step or task that needs to be completed in the process and is usually a rectangle.
- Flow: The flow symbol represents the direction of the process. It’s depicted as an arrow.
- Decision: The decision symbol represents a point in the process where a decision needs to be made. It is usually a diamond shape.
- Delay: This symbol conveys a pause or delay in the process. It’s represented as a half-oval shape.
- Document: The document symbol represents a document or piece of information that’s used or produced in the process. It’s depicted as a rectangle with a wavy bottom edge.
- Manual input: This symbol indicates a step that requires human intervention and is depicted as a parallelogram.
- Subprocess: This symbol represents a smaller process within the larger workflow. It is usually illustrated using a rectangle with a double border.
How To Do Workflow Process Mapping
Here are the steps to create and manage your company’s workflows properly.

1. Identify the Process to Map
Before you create a workflow, identify critical processes, those with the potential for improvement, and where the boundaries between processes are. This makes it easier to map and analyze.
Start by reviewing your company’s goals and objectives. Consider processes that are aligned with organizational goals and have a significant impact on performance. Factor in current processes that are experiencing issues or inefficiencies.
2. Identify a Process Owner
Designate a process owner to oversee mapping, make sure the implementation is successful, be directly involved in the day-to-day work, and have the authority to make decisions and drive changes.
This person will also provide the necessary resources and support, act as the main point of contact for any questions or concerns, and make sure the mapping aligns with the overall goals and objectives.
3. List All Activities, Inputs, and Outputs
List all activities, inputs, and outputs associated with the process, break down the process into individual components, and document each step in detail. You’ll also need to list dependencies between steps in the process, and what requirements need to be fulfilled at each step before the process can move on to the next step.
4. Sequence the Steps
Sequence the steps in the correct order. Arrange the activities in a logical sequence to reflect the actual flow of the process or a natural order that creates a smooth, logical flow. At this stage, you might discover some additional dependencies that you missed earlier—note these down.
5. Create a Flowchart
Create a flowchart (which you can do via an AI flowchart generator to save time) so you can visualize the entire process. This makes it easier to understand and analyze, and helps facilitate communication and collaboration with other people involved in the process.
Make sure you’re selecting the appropriate flowchart symbols to represent different elements of the process, and arrange the symbols in the correct sequence to reflect the order of activities and decision points.
For workflows with multiple decision branches, consider using a decision flowchart format to clearly represent conditional logic and downstream outcomes.
6. Document the Workflow Using Software
Document the workflow using workflow management software or workflow diagram tools. Most tools offer templates, intuitive interfaces, and all the symbols you need to create detailed and professional workflow diagrams. I also suggest using software because it makes it easier to update and modify your workflows as they change.
Start by inputting the process information into the tool. Use the software's features to create a digital version of your flowchart and incorporate all activities, decision points, inputs, and outputs.
7. Share the Process
Identify the key stakeholders who need to be informed about the mapped process, and choose the most appropriate method for sharing the process. This might include presentations, meetings, workshops, or digital platforms such as email or collaboration tools.
Highlight changes or improvements that have been made and emphasize the benefits of the new process. You should also encourage feedback and questions so stakeholders fully understand the process and feel engaged in the mapping exercise.
Workflow Process Mapping Examples
These business process mapping examples demonstrate how it helps you and your company achieve your goals.
Sales Process
Here’s what your workflow map might look like for a potential sales process:
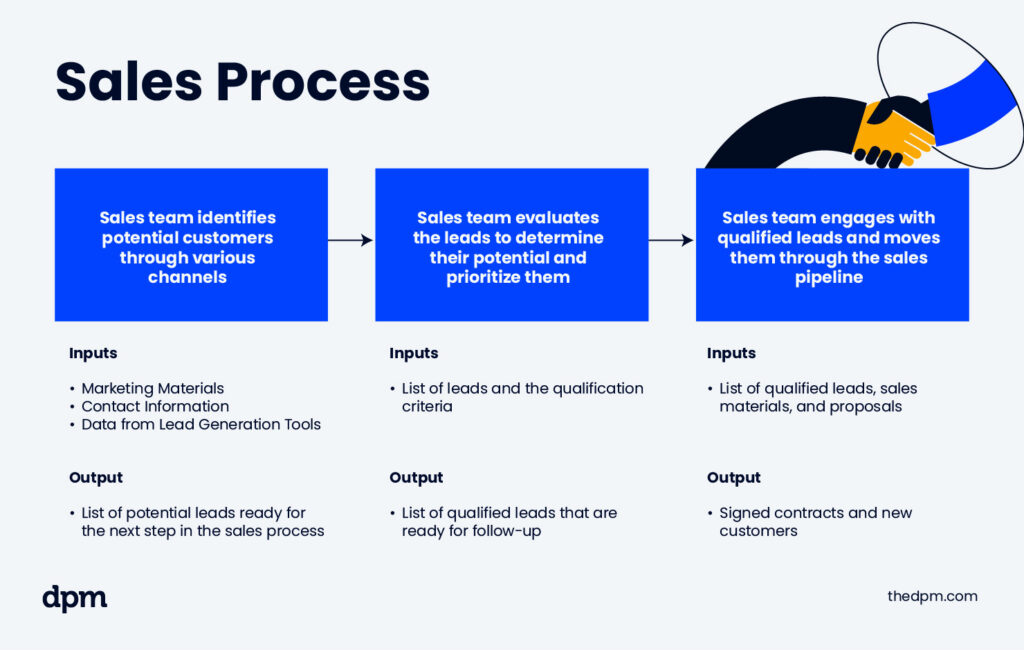
- The sales team identifies potential customers through various channels.
- The inputs: Marketing materials, contact information, and data from lead generation tools.
- The outputs: A list of potential leads that are ready for the next step in the sales process.
- The sales team evaluates the leads to determine their potential and prioritize them.
- The inputs: The list of leads and the qualification criteria.
- The outputs: A list of qualified leads that are ready for follow-up.
- The sales team engages with qualified leads and moves them through the sales pipeline.
- The inputs: The list of qualified leads, sales materials, and proposals.
- The outputs: Signed contracts and new customers.
Procurement Process
Here’s what your workflow map might look like for a potential procurement process:
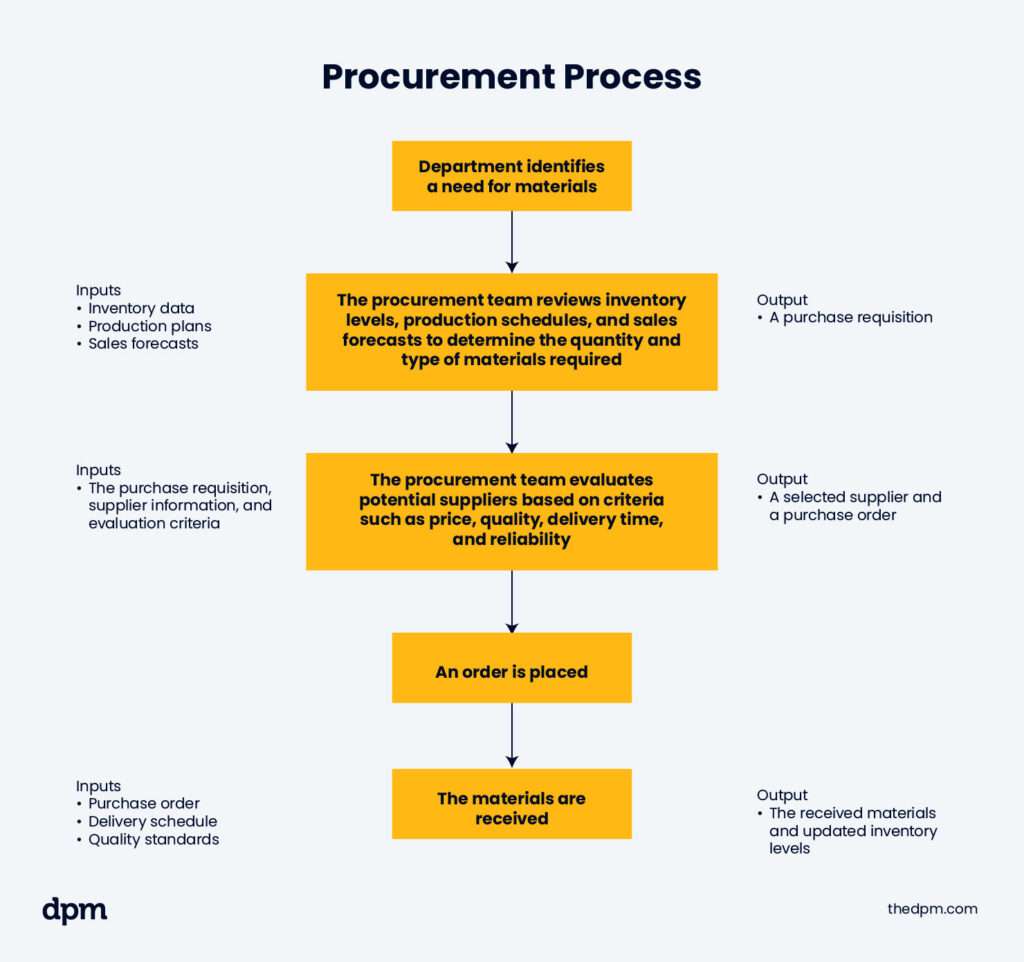
- A department identifies a need for materials.
- The procurement team reviews inventory levels, production schedules, and sales forecasts to determine the quantity and type of materials required.
- The inputs: Inventory data, production plans, and sales forecasts.
- The outputs: A purchase requisition.
- The procurement team evaluates potential suppliers based on criteria such as price, quality, delivery time, and reliability.
- The inputs: The purchase requisition, supplier information, and evaluation criteria.
- The outputs: A selected supplier and a purchase order.
- An order is placed.
- The materials are received.
Tools For Workflow Process Mapping
Here are some of the software tools you might use as you’re mapping out your workflow processes:
- Workflow diagram software lets you create visual maps of your processes. This makes it easier to spot inefficiencies, clarify responsibilities, and keep work running smoothly.
- Workflow management software helps you centralize and automate your workflows to reduce delayed tasks, miscommunications, and inefficiencies, and focus on the work that matters.
- Workflow automation tools let you automate repetitive and manual tasks. This makes managing your projects easier and reduces the need to spend unnecessary time and energy on repetitive tasks and business processes.
Tips for Workflow Process Mapping
Here are some additional tips for workflow process mapping.
1. Involve Stakeholders
Involve stakeholders from the beginning to make sure you capture all relevant perspectives and gain a complete understanding of the process. This helps to increase buy-in, support for the mapping exercise, and the chances of success.
For example, if you’re mapping a supply chain process, involve team members from procurement, production, and logistics. Conduct workshops or brainstorming sessions to facilitate open communication and collaboration. Remember to continue to include them throughout the implementation and review phases and provide regular updates.
2. Keep it Simple
Focus on the key activities, inputs, outputs, and decision points that define the process. Use clear and concise language to describe each element and avoid jargon or technical project management terms that may confuse stakeholders.
Create a project management flowchart, use standard symbols, and avoid overloading it with too much information. Make sure you keep the flowchart clean and uncluttered—use appropriate spacing and avoid overlapping lines or symbols. This makes it easier for everyone to understand and manage the process.
3. Continuously Review and Make Improvements
Regularly review your workflows to keep them accurate and relevant. Processes can change over time due to things like new technologies, market conditions, or organizational changes.
Regular reviews help you identify deviations or changes that need to be addressed. Make sure to gather feedback from the team as part of the regular review process.
4. Use Real World Examples
When you’re walking through your process, use a real example from your work. This provides practical context and helps stakeholders relate to the process. Examples can also help highlight the impact of improvements.
For example, if you’re mapping a customer service process, use a real life scenario where a customer contacts your company with an issue. Walk through the process step-by-step, showing how the issue is logged, diagnosed, and resolved.
Join For More Workflow Management Insights
Want to connect with other digital project managers to share resources and best practices? Join our membership community and get access to 100+ templates, samples, and examples, and connect with 100s of other digital project managers in Slack.

